Hello Berdo.
Having installed the development tools and created some basic examples, it's time to learn the basics of the JavaScript language.
If you do not know the basics whatever you do, I think that the basic is the most important because you will suffer later.
The basic types provided by JavaScript provide integer, real, character, and logical types.
Of course, there is no keyword to specify the type.
It adopts Auto type cast method which is automatically converted according to the incoming value.
Developers who are accustomed to compiled languages (as well as me) are comfortable with the scripting language for the first time, but sometimes they make mistakes because they are unfamiliar.
The keyword that declares the variable is 'var'.
As with all languages, the first start character is only in English and _ (underline).
Of course, you can not use keywords that are reserved in JavaScript.
(Reserved words:
goto, if, implements, import, import, boolean, break, byte, case, catch, char, class, const, continue, default, do, double, else, extends, false, public static void superimpose public static void superimpose void superimpose void superimpose void superimpose void superimpose void superimpose void superimpose while, with)
You will remember that you declared an existing class to store the value in the label control specified by 'Hello' id
var olabel = document.getElementById("Hello");
To configure the layout above, we will create code using html tag and css.
Run VSCode to create a blank page, save it as a new file, and create a file called 'textbaseball.html'.
I will put the basic html tag in the blank file as in the previous lecture and configure the basic page.

<title> Number Baseball Game </ title>
Add a title.
Next, add the html layout as shown below.

I will explain mainly what I did not see in the previous lecture.
An html tag has a tag that specifies start and end, and a tag that is used alone.
Among them, the tag "tag" serves as a line breaker.
The tag that starts with <img> is the tag that can put the image. After adding the 'img' directory to the 'textbaseball.html' file path storing the proper image among the images that I have, I save it as 'question.png' file I did it because it does not matter what the name is.
'Src' specifies the path to the image source. If the image exists locally, specify it as a relative path. Or, if you have an image online, you can also specify it as your web path.
'Width', 'height' specifies the size to specify a fixed size for the image. The unit is pixel.
A tag that begins with <input> is a tag that specifies input cast controls.
I used it to use text and buttons for the game.
'Type' indicates the input type, and you can see that it is used for 'text' and 'button'.
Additional forms of input can be learned through a separate search.
If you look at <input> where id is 'userinput'
You specified "size". This specifies that the input text should only be three digits long.
If you specify 'maxlength', you specify that you will receive a maximum of 3 digits.
In addition, when you specify a layout, the 'id' value is specified in JavaScript to control or fetch the value.
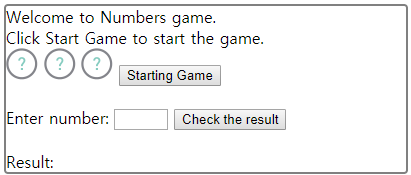
If you run it with the above code, it will appear as below.

It's different from the picture I originally presented.
My drawing has a rounded border and there is no picture above.
Let's draw a border using CSS which is not difficult.
To write CSS on an html page, use <head> </ head>
Put the <style> </ style> tag and place the desired CSS code inside it.
Now we will only add a border to the game board, so the code for doing that is shown below.

You'll see the line size, color, corner round, and size specified in the <style> </ style> starting with the 'div # GameBoard' directive.
This is what the CSS directive is supposed to do: replace the 'div' tag with the one specified by the 'GameBoard' id (what you're wrapped in {}).
To do this, we created a GameBoard with an id of <div>.
'Border' is a property that allows you to specify a border on a div. You can specify a value by specifying it as a space when specifying a value inside.
What I specified above is 2px size, solid line is solid and color is gray.
'Border-radius' rounds each corner of the border with a radius.
'Width' Specifies the width. If you do not specify it, you have specified a value because you specify the size of the web browser.
If you save and run again as above

The contents will be a little longer, so let's go on to the next lesson page by using basic basic grammar of JavaScript.
댓글 없음:
댓글 쓰기