2018년 6월 14일 목요일

JavaScript course 03-3

<JavaScript basic type & basic grammar utilization> 03-3

Hello Berdo

In the last lesson, we have completed the game start and end and random number generation to start the game.
This time, we will take input from the user, compare it with random number, print out the result, and finish the game.
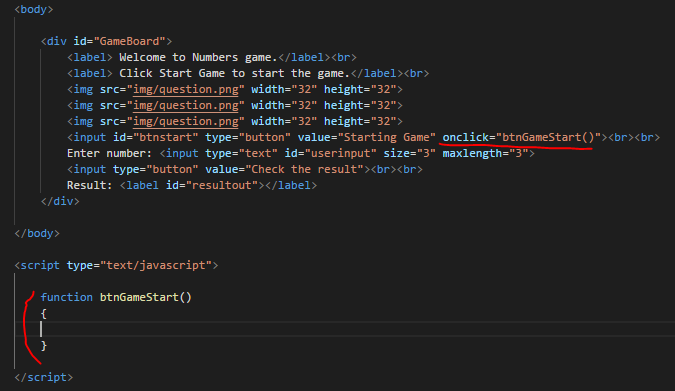
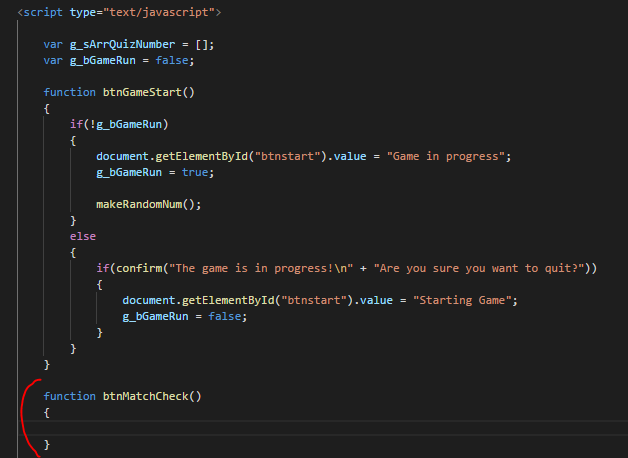
When the button is clicked like 'Start game' on the button 'Check result' html tag, we will link the event function and create a function in the JavaScript area.


Here's what you should do when the button is pressed:
  1. Is the game started?
  2. Is there a three-digit number entered?
  3. Compares the entered number with the random number. If the same number is the same number, 'strike'. If there is the same number in the other place, save the state as 'ball' and output the result.
  4. If all the digits are equal to random numbers, the game wins and the game ends.
So let's look at the finished code first.


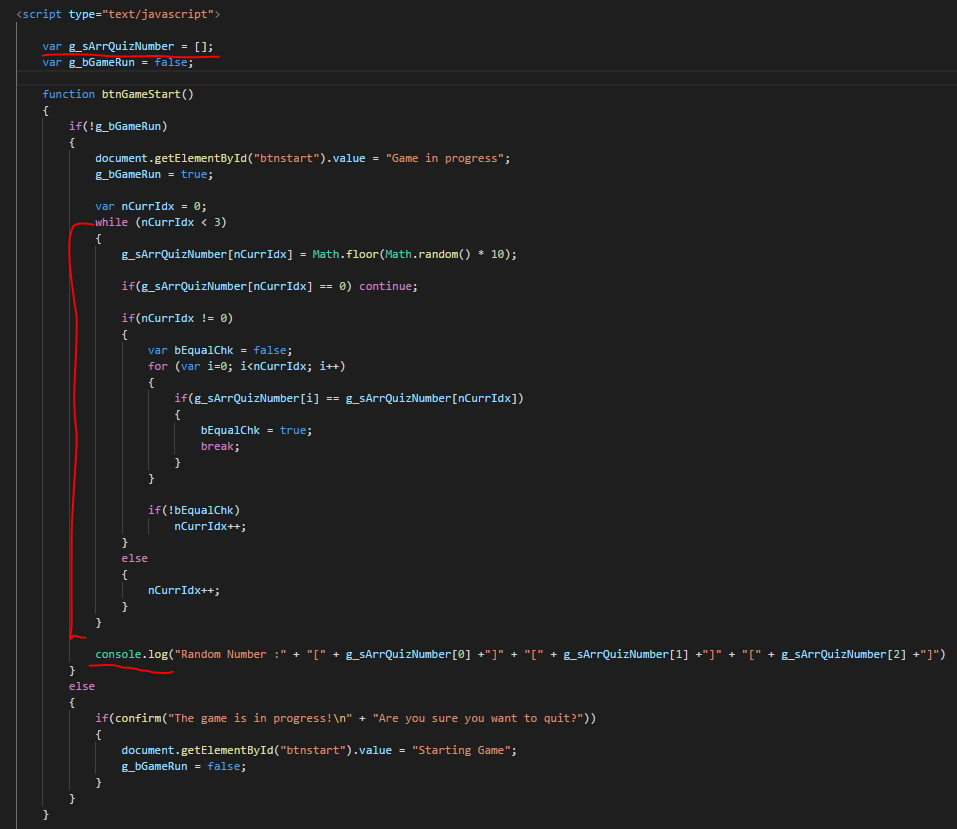
For the first time, use the g_bGameRun global variable to check whether the game is running and, if not,
Use a built-in function called 'alert' to pop up a message box prompting you to start the game first.
Secondly, if the game is started, take the value from 'userinput' and check the length using the if statement if the length is 3 digits.
Likewise, if it is not 3 digits, 'alert' is used to display the message and request to enter again.
To do this, the function should no longer be executed, so we use the keyword 'return' to terminate the button click function.
The third digit is a section that compares the random number with the entered number.
It may seem complicated because it consists of two double for statements, but the principle is simple.
In a for statement that starts with var = i, check the Strike value.
Check the ball value in a for statement that begins with var = j.
The fourth step is to print the results or exit the game.
If the nStrike value is 3, a message will be displayed to end the game, and the game will be re-initialized and the random number value will be initialized.
If the nStrike value is not 3, the number is not correct.
We then use the 'focus ()' method to re-enter the edit so we can re-enter the edit.
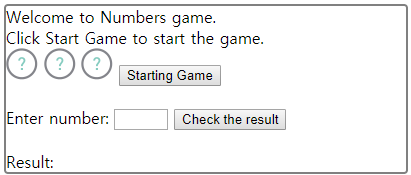
If you finish the code to this point and proceed to play the game, you can see that the game is running normally.
I learned how to access the basic html tag values ​​from JavaScript by using basic syntax and Java variable declarations.

Next time I'll talk about how to implement OOP in JavaScript. ^^

The pool source used in the course will be shown back to the source code. ^^


  1
  2
  3
  4
  5
  6
  7
  8
  9
 10
 11
 12
 13
 14
 15
 16
 17
 18
 19
 20
 21
 22
 23
 24
 25
 26
 27
 28
 29
 30
 31
 32
 33
 34
 35
 36
 37
 38
 39
 40
 41
 42
 43
 44
 45
 46
 47
 48
 49
 50
 51
 52
 53
 54
 55
 56
 57
 58
 59
 60
 61
 62
 63
 64
 65
 66
 67
 68
 69
 70
 71
 72
 73
 74
 75
 76
 77
 78
 79
 80
 81
 82
 83
 84
 85
 86
 87
 88
 89
 90
 91
 92
 93
 94
 95
 96
 97
 98
 99
100
101
102
103
104
105
106
107
108
109
110
111
112
113
114
115
116
117
118
119
120
121
122
123
124
125
126
127
128
129
130
131
132
133
134
135
136
137
138
139
140
<!DOCTYPE html>
<html lang="en">
<head>
    <meta charset="UTF-8">
    <title>Number Baseball Game</title>

    <style>
        div#GameBoard {
            border: 2px solid gray;
            border-radius: 4px;
            width: 400px;
        }
    </style>
</head>
<body>

    <div id="GameBoard">
        <label> Welcome to Numbers game.</label><br>
        <label> Click Start Game to start the game.</label><br>
        <img src="img/question.png" width="32" height="32">
        <img src="img/question.png" width="32" height="32">
        <img src="img/question.png" width="32" height="32">
        <input id="btnstart" type="button" value="Starting Game" onclick="btnGameStart()"><br><br>
        Enter number: <input type="text" id="userinput" size="3" maxlength="3">
        <input type="button" value="Check the result" onclick="btnMatchCheck()"><br><br>
        Result: <label id="resultout"></label>
    </div>

</body>

<script type="text/javascript">

    var g_sArrQuizNumber = [];
    var g_bGameRun = false;

    function btnGameStart()
    {
        if(!g_bGameRun)
        {
            document.getElementById("btnstart").value = "Game in progress";
            g_bGameRun = true;

            makeRandomNum();
        }
        else
        {
            if(confirm("The game is in progress!\n" + "Are you sure you want to quit?"))
            {                
                document.getElementById("btnstart").value = "Starting Game";
                g_bGameRun = false;
            }
        }
    }

    function btnMatchCheck()
    {
        if(g_bGameRun)
        {
            var sInputValue = document.getElementById("userinput").value;
            console.log("User Input : " + sInputValue);

            if(sInputValue.length != 3)
            {
                alert("You must enter 3 numbers.");
                return;
            }

            var nStrike=0;
            var nBall=0;
            for(var i=0; i<3; i++)
            {
                if(g_sArrQuizNumber[i] == sInputValue.charAt(i))
                    nStrike++;
                else
                {
                    for(var j=0; j<3; j++)
                    {
                        if(g_sArrQuizNumber[j] == sInputValue.charAt(i))
                            nBall++;
                    }
                }
            }

            if(nStrike == 3)
            {
                var sResult = "Congratulations. I won the game !!";
                document.getElementById("resultout").innerHTML = sResult;
                initGameState();
            }
            else
            {
                var sResult = "The results you enter is" + "[ " + nStrike + " Strike ][ " + nBall + " Ball]";
                document.getElementById("resultout").innerHTML = sResult;

                document.getElementById("userinput").value = "";
                document.getElementById("userinput").focus();
            }
        }
        else
        {
            alert("This is not a game. Begin playing the game first. ^^");
        }
    }

    function makeRandomNum()
    {
        var nCurrIdx = 0;
        while (nCurrIdx < 3)
        {
            g_sArrQuizNumber[nCurrIdx] = Math.floor(Math.random() * 10);

            if(g_sArrQuizNumber[nCurrIdx] == 0) continue;

            if(nCurrIdx != 0)
            {
                var bEqualChk = false;
                for (var i=0; i<nCurrIdx; i++)
                {
                    if(g_sArrQuizNumber[i] == g_sArrQuizNumber[nCurrIdx])
                    {
                        bEqualChk = true;
                        break;
                    }
                }

                if(!bEqualChk)
                    nCurrIdx++;
            }
            else
            {
                nCurrIdx++;
            }
        }

        console.log("Random Number :" + "[" + g_sArrQuizNumber[0] +"]" + "[" + g_sArrQuizNumber[1] +"]" + "[" + g_sArrQuizNumber[2] +"]")
    }

</script>

</html>

JavaScript course 03-2

<JavaScript basic type & basic grammar utilization> 03-2

Hello Berdo

In the last lesson, I tried to configure the default page to implement the game.
Now let's take user input and implement it using JavaScript.
The first thing to do is to manage the beginning and end of the game.
If the button that was created as 'game start' is pressed among the existing buttons, we will input the function as JavaScript and process it.


The event when the button is pressed is 'onclick'. The function corresponding to this event is specified as 'btnGameStart ()'.
Now let's look at the JavaScript functions first.
function The function name (parameter 1, parameter 2 ...)
{
}
A JavaScript function starts with the directive function, and the function name is specified, and the arguments are specified according to what is written.
If you are familiar with the compilation language here, you will see that there is no function return type or parameter type indicator.
The scripting language does not specify because the type is actually read and specified when the code is run.
Now that we have connected the JavaScript function to the button event, let's put the code that breaks the start / end of the game.


We've declared variables globally to be accessible anywhere in the function to manage the start of the game.
var g_bGameRun = false;
In JavaScript, the keyword used to declare a variable is 'var'.
You can specify a string, number, Array, HashMap, or Object type with a single 'var' keyword.
In a word, it is all-around. ^^
We use the Hungarian rule to specify 'g_' to distinguish global variables.
Then use the if / else statement to globally declare variables to manage the game state.
The If / else statement is the same as C or Java syntax.
The '!' Operator is the opposite of the bool value, that is, if it is true, it is made false. If it is false, it is checked as true.
So if you look at the code above, g_bGameRun = false; The value is entered, but it does not escape to the else statement while meeting the if statement.
I have placed the code to view the status of the game and change the value with the 'btnstart' ID to 'in progress' or 'start game'.
When the game is running again, if the button is pressed again, we have created the code to be terminated by using the 'confirm' function provided by JavaScript so that it can be terminated with the user's consent.
If 'Yes' is pressed after 'confirm' function call, it is judged as true and the following code is executed.
Now that we have created and started the game, let's create a code that generates a three-digit number to start the game.


Create a three-digit random number and later create a global variable to compare with the number you entered.
var g_sArrQuizNumber = [];
If you declare a variable like the above, you will specify the variable arrry.
The above code creates a 3 digit random number code starting from the while statement.
The while statement also has the same usage as the C language Java language.
Only when the condition starting with the while statement is satisfied will it be repeated.
The generated code is designed to repeat the loop only until the value of the local variable declared in nCurrIdx is less than 3.
The following code is shown below.
g_sArrQuizNumber [nCurrIdx] = Math.floor (Math.random () * 10);
In the code above, the first thing we want to talk about is the JavaScript array method.
You can think of the Array method created in Java as a mixture of Array and HashMap.
In the above code, g_sArrQuizNumber can be assigned to a specific index immediately after the Array object has not been sized. This is a method that can be used in a HashMap in a general compilation language.
However, the JavaScript language is a mixture of the two, so people who are accustomed to the compilation language may come to the point where they are confused. I would like to know if you have such experience and if you have any confusion.
As you create your code, you define it according to the flow of code you write to the Array or HashMap. However, since you can not memorize when you need to modify the code in the future, you can use it to declare the purpose of the variable declaration using the superscript.
That's why I created a quiz random number store starting with 'g_sArr'.
The second is a Math object.
The Math object is a built-in object with properties and methods for mathematical constants and functions.
Returns an integer less than or greater than the number given by the Math.floor argument.
Math.random is a method that flips random numbers.
Since the returned value returns a value between 0 and 1, multiply the returned value by 10 to get the desired value.
Then we can get the desired number between 0 and 9, and if it gets 0, we do not save it immediately, but use the keyword 'continue' to start the loop of the while statement again from the beginning.
The next code is a code that checks whether the newly generated random number overlaps with the existing number if the nCurrIdx value is not 0.
The for statement, which is not described here, comes out, and the for statement is also the same as the C language and the Java language.
for (start condition; end condition; condition change expression)
{
}
Looking at the code, we loop through the variable starting with i while the value is less than the nCurrIdx value to compare the new random number to the existing number.
If it is the same, you can use 'break' to force the loop to exit, and set the state variable bEqualChk to 'true' to get the value back into nCurrIdx before you exit.
Finally, output the result using console.log.
This can be confirmed by using the debugging window of the web browser. When you press Ctrl + Shift + I in the chrome browser, the developer tool comes out. You can see the output on the console window tab there.


We confirmed that we made the value at random.
I think I need to call it again to make a random number, so I'll separate the logic into separate functions.


Create the function 'makeRandomNum ()' as above and move the existing code into the function
We changed the structure to call the function when the button is pressed and the game starts.

I will finish the game using basic basic grammar of JavaScript in the next course page.

JavaScript course 03-1

<JavaScript basic type & basic grammar utilization> 03-1

Hello Berdo.
Having installed the development tools and created some basic examples, it's time to learn the basics of the JavaScript language.
If you do not know the basics whatever you do, I think that the basic is the most important because you will suffer later.

The basic types provided by JavaScript provide integer, real, character, and logical types.
Of course, there is no keyword to specify the type.
It adopts Auto type cast method which is automatically converted according to the incoming value.
Developers who are accustomed to compiled languages ​​(as well as me) are comfortable with the scripting language for the first time, but sometimes they make mistakes because they are unfamiliar.
The keyword that declares the variable is 'var'.
As with all languages, the first start character is only in English and _ (underline).
Of course, you can not use keywords that are reserved in JavaScript.
(Reserved words:
goto, if, implements, import, import, boolean, break, byte, case, catch, char, class, const, continue, default, do, double, else, extends, false, public static void superimpose public static void superimpose void superimpose void superimpose void superimpose void superimpose void superimpose void superimpose while, with)

You will remember that you declared an existing class to store the value in the label control specified by 'Hello' id

var olabel = document.getElementById("Hello");


To configure the layout above, we will create code using html tag and css.
Run VSCode to create a blank page, save it as a new file, and create a file called 'textbaseball.html'.
I will put the basic html tag in the blank file as in the previous lecture and configure the basic page.


<title> Number Baseball Game </ title>
Add a title.
Next, add the html layout as shown below.


I will explain mainly what I did not see in the previous lecture.
An html tag has a tag that specifies start and end, and a tag that is used alone.
Among them, the tag "tag" serves as a line breaker.
The tag that starts with <img> is the tag that can put the image. After adding the 'img' directory to the 'textbaseball.html' file path storing the proper image among the images that I have, I save it as 'question.png' file I did it because it does not matter what the name is.
 'Src' specifies the path to the image source. If the image exists locally, specify it as a relative path. Or, if you have an image online, you can also specify it as your web path.
 'Width', 'height' specifies the size to specify a fixed size for the image. The unit is pixel.
A tag that begins with <input> is a tag that specifies input cast controls.
I used it to use text and buttons for the game.
 'Type' indicates the input type, and you can see that it is used for 'text' and 'button'.
 Additional forms of input can be learned through a separate search.
 If you look at <input> where id is 'userinput'
   You specified "size". This specifies that the input text should only be three digits long.
   If you specify 'maxlength', you specify that you will receive a maximum of 3 digits.

In addition, when you specify a layout, the 'id' value is specified in JavaScript to control or fetch the value.
If you run it with the above code, it will appear as below.


It's different from the picture I originally presented.
My drawing has a rounded border and there is no picture above.
Let's draw a border using CSS which is not difficult.

To write CSS on an html page, use <head> </ head>
Put the <style> </ style> tag and place the desired CSS code inside it.

Now we will only add a border to the game board, so the code for doing that is shown below.


You'll see the line size, color, corner round, and size specified in the <style> </ style> starting with the 'div # GameBoard' directive.
This is what the CSS directive is supposed to do: replace the 'div' tag with the one specified by the 'GameBoard' id (what you're wrapped in {}).
To do this, we created a GameBoard with an id of <div>.
 'Border' is a property that allows you to specify a border on a div. You can specify a value by specifying it as a space when specifying a value inside.
 What I specified above is 2px size, solid line is solid and color is gray.
 'Border-radius' rounds each corner of the border with a radius.
 'Width' Specifies the width. If you do not specify it, you have specified a value because you specify the size of the web browser.

If you save and run again as above


The contents will be a little longer, so let's go on to the next lesson page by using basic basic grammar of JavaScript.

2018년 6월 6일 수요일

vcxproj is not supported by this version of the application

I do not know why, but as usual with Visual Studio 2013, when I try to open a project to start work, the project is not loaded with the following error message.
"vcxproj is not supported by this version of the application"
I had to reinstall Visual Studio, which is a very troublesome one.
If you have a similar experience, you can solve it by running as below.
<Solution>
1. Locate the folder where Visual Studio is installed with File Explorer.
   (In general, if you did not change the installation path, it will be installed as below.
   "C: \ Program Files \ Microsoft Visual Studio 12.0" by Visual Studio 2013)
2. Navigate to the sub-path "Common7 \ IDE" folder.
3. Delete the "ItemTemplatesCache" and "ProjectTemplatesCache" folders in the above path.
4. Run Visual Studio Command Prompt as an administrator.
5. In the console window, type "devenv / InstallVSTemplates" and wait for the command to process.
6. At the end of the above command, type "devenv / Setup" and wait for the command to be processed.
After doing the above, please run Visual Studio again and load the project and it will be loaded.
You can also check the contents of the above process by referring to Microsoft Social below. ^^
(https://social.msdn.microsoft.com/Forums/en-US/c2e7d00a-b67a-4fb6-929b-07686f765597/defaultvcxproj-cannot-be-opened-because-its-project-type-is-not-supported ? forum = vssetup)

2018년 6월 4일 월요일

JavaScript course 02

<JavaScript development preparation & Hello World>


Hello Berdo.
In order to develop JavaScript, you have to build a development environment.
We currently use the WebStorm tool, but since it is commercial, we recommend SublimeText3 or Visual Studio Code among the free tools.
We look for additional convenience and environment for development.
Setting up a basic development environment will be explained using Visual Studio Code.

Download the latest version according to the O / S that you use in the link path below.
https://code.visualstudio.com/download

If you execute after installation, you can see the following execution screen.


It is not necessary to create an html file or js file immediately after installation, but install vscode add-on and use it.
(Use related html, javascript, jquery etc. after installing add-on)

The basic thing is what you have installed, and what you need is a browser installation for testing.
If you are currently using Windows, you will have internet explorer installed. If you are running Windows 10 or later, there will be two Edge.
Of course, it is not too bad to check the development results by using two of them, but if you want to develop web, you need to check the results in various web browsers.

FireFox Browser
  https://www.mozilla.org/en/firefox/new/
Chrome Browser
  https://www.google.com/chrome/index.html

Although there are advantages and disadvantages of both browsers, it is the most faithful support for html5 function that is commonly supported in the latest.
I personally prefer FireFox, but during development, I usually check the good and the result of Chrome Browser debugging function there.

Screen to run in Chrome Browser and debug in developer mode)

Run the Chrome Browser and press Ctrl + Shift + I to see the Developer Mode window as shown above.

Now the basics are ready.
Let's create a simple html file and javascript to create a web sample screen.
Let's create a "Hello World" that does not lag behind in terms of legitimacy. ^^

In VSCode, create a blank editor window by pressing Ctrl + N or File -> New from the menu.
Here's the code for a basic html page template.


<! DOCTYPE html>

<html lang = "kr">

<head>

     <meta charset = "UTF-8">

     <title> </ title>

</ head>

<body>

</ body>

</ html>

If you are wondering about the above html code, it is not difficult to find the basic html.

Type 'Hello World' inside <title> Hello World </ title>.
The above content is what you see in the browser caption area.

<body>
  <label> Hello World </ label>
</ body>

<body> </ body> Create a label area between the tags and type 'Hello World' as the content.

Then save the file as html and make sure that the basic html file is working in your browser.
Press Ctrl + Shift + S or click File -> Save As to save the file as 'helloworld.html'.

After saving, you can see that VSCode's tab icon and code contents are highlighted


Just go to the file folder and run it with your Chrome browser.

You can see that it works as above.

Now let's change the text in the label to 'Hello World With JavaScript' using basic JavaScript code.

To put javascript code in html
At the end of </ body>
<script type = "text / javascript">
</ script>
Tag.

Since the html page is loading and I want to change the sentence, change the <body> part as shown below.
<body onload = "InitPage ()">
If you change the above, the html page is loaded in your browser, and it is a structure that calls InitPage () defined in javascript with a function called onload.

Then declare the function because a function called InitPage () must exist in the javascrpt tag.


<script type = "text / javascript">

function initPage ()
{
}

</ script>

In order to access the <label> in JavaScript before creating the code that changes the contents of the <label> tag inside the function declaration and the function that is called at the beginning, it is necessary to specify a special name for <label> .
<label id = "Hello"> Hello World </ label>


function initPage()
{
    var olabel = document.getElementById("Hello");
    olabel.innerHTML = "Hello World With JavaScript";
}

An object called document points to the current page. getElementById is a function to get the member to the current page based on the Id. So if you call it like above, you can get the item defined by label tag.
A property called innerHTML can directly manipulate the content between <label> </ label>. So when you write code like this, the <label> code on the page actually
<label id = "Hello"> Hello World Width JavaScript </ label>
And the same effect.

Then we will simply change the application to save the string "Hello World" and add it with "With JavaScript".


function initPage ()
{

        var olabel = document.getElementById ("Hello");
        var sOrg = olabel.innerHTML;
        sOrg + = "With JavaScript 2";

        olabel.innerHTML = sOrg;
}

As you can see in the code above, innerHTML can be used to get the existing values. The reason I put "2" after it is added to show the difference.

I've seen how to use basic html pages as JavaScript code by installing a basic tool, installing a browser, and creating simple html code and adding a script in it.

Next, let's look at the JavaScript basic types, basic grammar, and how to check basic types.

2018년 6월 1일 금요일

JavaScript course 01

<Introduction to JavaScript>
Hello Berdo.
Starting with this lesson, I will introduce 10 languages ​​to the JavaScript language I have learned and learned while creating WebFramework.

Generally speaking, the reason why you think JavaScript language is the same as java language is that the grammar structure is similar.
The official name of the current JavaScript is ECMAScript.
The current version is the latest version 6, but if you want to write code compatible with all browsers, it is recommended that you hand it to 5 version
What stands out among the 6 versions is that there is a keyword 'class'.

I have used the compilation language mainly as a development language, and I can list the characteristics of the JavaScript language as follows.

1. C ++ and Java language can be mastered in a short time if they are proficient in basic language.
2. There is no restriction on Typecast, so if you are familiar with the compiling language, there are a lot of code that is not structurally understandable. (This section will be explained later in the course.)
3. If you know JavaScript properly, you should understand html page.
4. Functional programming is basic but enough OOP functions can be implemented.
5. Currently, it is widely used in server (node.js) and client (web, webapp [mobile]).

Learning something is a joyous thing, and using it to create something new is even more enjoyable. ^^